May 31, 2011

Painted Quatrefoil Tray

I hope everyone had a wonderful Memorial Day!  In between relaxing, barbeques, and spending time with friends in family we squeezed in some DIY projects.  And I finally finished a project I had been working on for much longer than I should have.

Last year, I bought this honey oak wood tray at a garage sale for just $1.  The finish was nothing to brag about, but I liked the cute shape and knew I could refinish it.

wood-tray

The great part about this project is that I used only supplies I already had on hand, so the entire tray cost me just 1 buckaroo!  I started to refinish the tray by lightly sanding it and then applying a spray paint primer.  I knew I wanted it to be white, so then I painted it using white latex paint I already had (leftover from painting doors and trim).  I had trouble hiding all of my brush strokes, so I finished my white layer with a  coating of white spray paint.

white-painted-tray

Already the tray was looking better with a nice crisp white finish, but I decided to spice it up a little with a painted pattern.  Luckily, I found a free quatrefoil stencil on the CSI project (thanks!).  The pattern was a little too large for my tray, so I scaled it to 70% on my computer before printing it.

paint-stencil

To make a stencil, I decided to cut it out of a plastic presentation cover. I taped the stencil to it, attached it to a catalog so I wouldn’t cut my coffee table underneath (Garnett Hill was my choice.  Side note: they have such pretty stuff, but it’s so darn expensive), and then I got to work with my exacto knife.

quaterfoil-pattern

Turns out, the plastic cover was pretty thick and I had trouble cutting smooth lines with it with my exacto knife (but maybe I wasn’t using the best knife, I had bought the cheapest one at AC Moore).

quatrefoil-stencil

I decided to try to paint with the stencil any way, but my lines looked pretty jagged with it.

painting-stencil

So onto plan B, I cut the same pattern out of construction paper.  The paper was much easier to cut than the report cover and it worked great at first…until it ripped about halfway through!

painting-stencil-tray

Not wanting to cut a third stencil, I went back to the plastic cover, trying to be as careful as possible.  It wasn’t perfect, but I decided to just finish the job with it and then go back and retouch later. And retouch I did, handpainting the green portion and then the white part with a paint brush.

stenciling-tray

Once all of the paint was dry, I finished the tray by spray painting it with Minwax Polycrylic protective spray.  It gave the tray a nice glossy coat and will hopefully protect the paint from scratches.  The tray was much more time consuming than I had planned, but it was worth the effort.  Check it out!

quaterfoil-tray

I’ve been using it in my family room on top of my ottoman coffee table.  It’s great to have a hard surface to place drinks and other stuff on top of the soft table.  I’ve been playing around with how to decorate it, and so far have a white lantern, my shell filled with shells, and a little green vase.

quatrefoi-tray

It also looks cute with a plant on it.  I’m really enjoying this quatrefoil tray and although it took a while to complete, I feel so happy and proud every time I look at it!

quatrefoil-painted-tray

And because we all love before and afters, here’s a recap!

painted-tray-before-after

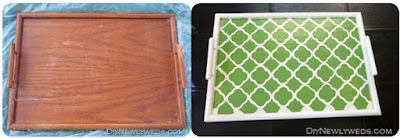
Not bad for $1 buck, right?


I'm linking this project up to The DIY ClubToday's Creative Blog, Silly Little Sparrow, Sew Much Ado, Women Who Do It All, Savy Southern Style, Tatertots and Jello, The DIY Showoff, Southern Hospitality, and Home Stories A2Z.

May 26, 2011

Summer Decorating

It may be not officially be summer, but I've had summer on my mind since pretty much last summer.  So it's not surprise that as soon as the weather got a little bit warmer, I broke out my summer decor.

I didn't waste any time decorating my living room coffee table for warmer weather.  


I decorated the table with two beachy white lanterns that I filled with seashells (the larger one holds a candle too).  I also added a faux starfish and fish shaped seaglass that I bought on vacation in Bermuda.  And I tied everything together by placing it on a rattan place mat.

With the exception of the sea glass, I got the rest of the decor at the Christmas Tree Shop, including the starfish and even sea shells.


I continued the beachy look into the family room where I updated our mantle.  As you can obviously see, we have a honking big TV that doesn't leave much room to decorate the mantle.  Don't get me wrong, I love our huge TV as I am a total TV addict, but I know it's not the most design friendly choice.

P1160088

Even so, I have a little room to the left and right of the TV for a few beach inspired decorations.  On the left I used a white lantern (from Target) and faux coral (Christmas Tree Shops).  And on the right, I filled a glass vase with sand I brought home from Bermuda and a candle.  I also add another starfish and a sea urchin shaped candle holder.

P1160069

I may have to wait another month before summer "officially" begins, but I'm mentally there already! Have you begun decorating for summer?


I'm linking this post to Layla's summer mantle party at The Lettered Cottage.

May 24, 2011

Imitation Crabmeat and Avocado Crostini

This blog post comes with a warning.  I’m about to share a recipe for an imitation crabmeat and avocado appetizer, but I must warn you that if you bring this dish to a party your friends will want you to bring this dish EVERY TIME there is a party.  I’m not kidding.  Luckily, this imitation crab and avocado crostini is easy to make…and seriously delicious!

crab-avocado-crostini

This recipe is based on a recipe for a Crab and Avocado Crostini from Brian Boitano’s show on the Food Network, but I’ve modified it to replace some hard to find ingredients, make it a little more wallet friendly (real crab meat is expensive!) and to tweak the flavors a bit.

Here’s what you’ll need:

crab-avocado-crostini-ingredients

- 8oz Imitation Crab Meat
- 2 Haas Avocados
- 1 Bell Pepper
- Scallions (Green Onion)
- 1 Orange
- 1 Lemon
- 1/4 cup Extra Virgin Olive Oil
- Baguette Bread
- Salt & Pepper
- 1 Garlic Clove

Squeeze the juice of half a lemon and half of an orange into a bowl.  Wisk together with the olive oil and add salt and ground pepper to taste.

Into your bowl, chop up the bell pepper and scallions.  I chose a green bell pepper this time (because they were on sale and the red ones were something crazy like $4/lb), but I like to use a red or orange pepper when I can because it adds a nice color to the dish.

peppers-scallions

Chop up your avocados and add them to the bowl too.

avocado

Add 8oz of imitation crab meat.  Mix together so everything gets covered in the olive oil/juice mixture.

crab-avocado-dip

Next, slice your baguette.  It’s up to you if you want to toast it.  When I use a multigrain French baguette I leave it untoasted as it gets a little too dry once toasted.  However, if I use a loaf of white Italian bread I will slice it, drizzle it with a little olive oil, and then toast for a couple of minutes in my toaster oven.  If you go the toasted route, I highly recommend rubbing a clove of garlic on each slice of bread as soon as it comes out of the toaster oven.  When the bread is hot, the garlic melts right into it and gives the crostini a nice kick.  Your spouse/loved ones will also get a nice kick when they try to talk to you from the horrible garlic breath it causes (but the tastiness is sooo worth it).

Then, just spoon the crab and avocado mixture onto your sliced bread, making sure to get a little of each ingredient and the olive oil mixture on each slice.

Enjoy!  I promise your friends will love this recipe!

crab-avocado-appetizer


I'm sharing this recipe at Rhoda's recipe party on Southern Hospitality.

May 19, 2011

We Got A Gazebo!

We got a gazebo! I’m excited and I’m getting straight to the point in this post.  We got a gazebo!

I quickly snapped some photos of it yesterday in between rain showers.  It’s been raining here pretty much everyday for the last week so I haven’t been able to get any good photos yet, but I couldn’t wait any longer to share the news.outdoor-gazebo

We’ve considered getting a gazebo since we installed our patio two years ago.  I found a great deal on this one at the Christmas Tree Shops and decided to get it.  I’m so happy I did!

outdoor-gazebo-seating

It’s a 10’ by 10’ gazebo and we’re furnishing it with the patio furniture we already own, including our wicker loveseat and the coffee table I spray painted.  I added had a small green rug that I had once bought for my kitchen but it wasn’t a good fit.

patio-furniture

I’m still in the process of decorating and would like it to feel like I’m relaxing on vacation, but I’m trying to find a balance so I don’t overdue it with too much kitschy beach décor.

…but I’ve already bought two cutesy welcome signs!

seagull-welcome-sign

crab-welcome-sign

The main reason we wanted to a gazebo is for privacy since we’re so close to our neighbors and they can peak into our yard.  The gazebo makes our patio seem a little more private.  It came with mosquito netting which can be tied back or zipped to enclose the entire gazebo.  In addition to keeping flying critters out, it also adds a nice feeling of privacy.  Plus it has a pretty breezy look.

gazebo-netting

Now you know where to find me on the weekends- relaxing in the gazebo!  I still plan to decorate it some more, but I’m enjoying it already!  What are your thoughts on patio gazebos?  Are you a fan?

I'm linking up to the outdoor party at Centsational Girl.

May 17, 2011

Spray Painting Patio Furniture

You’ve already seen what we’ve been busy with in our front yard, but we’ve been working on our backyard too and I have a few things up my sleeve!  First up is actually a project I completed months ago but then forgot to share (bad blogger!)

When we installed our patio, we didn’t have much budget left over for patio furniture.  I had bought a wicker loveseat at Ross, but wanted a table to match, so I was really happy to come across this little table on clearance at Target.

patio-seating-area

It was cute, but I would have preferred matching furniture for a more cohesive look. 

mismatched-wicker-patio-furniture

So what’s a girl to do?  Break out the spray paint of course!

outdoor-spray-paint

I used Krylon Outdoor Spaces in “Earth” color and gave the table a few coats.

spray-paint-plastic-wicker-patio-table

And the table turned out pretty darn well!

spray-painted-patio-furniture

It’s not a 100% match to the loveseat, but it’s pretty close and is a much better color than before.  I’ll be sharing more patio updates soon, so stay tuned!  Are you doing any outdoor projects this year?

I'm linking this post up to the spray paint party at Thrifty Decor Chick, The DIY Show Off, Tip JunkieToday's Creative Blog.

May 16, 2011

Front Yard Landscaping Progress

This weekend I got to work adding plants to our front yard retaining wall.  It’s not done yet, but I wanted to share some of our progress.  Here’s a reminder of how our front yard looked after installing the retaining wall:

front-yard-landscaping-wall

And here’s how it looks after this weekend:

front-yard-retaining-wall

It’s not done yet, but it’s certainly a nice improvement!  I still want to add some shrubs, but here’s a look at what we planted so far.

In the top tier, I planted all perennials:

garden-perennials

The Mandevilla is a Sun Parasol Crimson Mandevilla which can grow over 10 feet tall, so I may need to add lattice or another support for it.  I’d like something tall in that spot to hide the ugly utility meters in the background.  But after I planted it, I did some more research on Mandevillas and read that they need to be taken indoors in the winter up North.  Uh-oh, I didn’t know that when I bought.  Anyone have experience with these and know if I have to take it indoors or if I can just cut it back and leave it in the ground over winter?

In the bottom tier of the retaining wall, I used a mix of perennials and annuals.

front-yard-flowers

These flowers are all still small, so I’m looking forward to them growing and filling out the the bed. 

I think I’m done planting flowers for now, but I’d like to add some evergreen shrubs to both tiers so that there’s something to look at during the winter.  I think I’ll go with a Golden Thread Cypress.  We have 4 of these bushes in our backyard and I’ve been very happy with them. 


I’ve also been researching other types of evergreen shrubs and came across the Japanese Skimmia.  This seems like a great shrub because it’s an evergreen, but has white flowers in the spring and red berries in the fall/winter.  It sounds like it will look pretty cool in all seasons.


Do you have any experience with the Japanese Skimmia?  I’d also love to hear recommendations for any other plants or shrubs!

May 13, 2011

DIY Map Mania

Maps, maps, maps! Map projects seem to be everywhere these days and I'm not surprised, maps make for some very cute (and cheap!) DIY projects.  I have yet to make my own map project, but I would like to, so I've been collecting some ideas.  Here are some of the awesome map projects I've come across:


Are you loving the recent map trend too?  I'm excited to try out my own map project.  Have you created any projects with maps?

P.S. I've found many of these project ideas on Pinterest (the virtual idea pinboard site).  It's such a great site to find, save, and share ideas!  You can see what I'm pinning here!

May 09, 2011

My Favorite Projects: April 2011

Happy May! I hope everyone had a lovely Mother’s Day and is enjoying May so far. But before we get too into the month, I wanted to share some of my favorite projects that I came across in April.

Coral Tissue Paper Decoupage Candle by A Soft Place to Land


Coral Wall Art by Attempting Aloha


Ribbon Picture Frame Matting by Charcoal and Crayons


Fun Garage Makeover by found via Curbly

Did you come across any great projects last month?  Feel free to link them up in the comments!

P.S. If you've been featured this month (or last month), feel free to grab a button to display on your site!


May 04, 2011

Front Yard Retaining Wall

You might remember that late last year we started a front yard landscaping project to add a paver walkway and retaining wall.  In it's hay-day, our front yard looked like this:

But after a hot summer and tripping over the front bushes countless times while holding bags of groceries, we decided to remove the bushes and add a paver walkway instead.  At this point the front yard looked like this:


Not as pretty.  So we dug up the bushes and put down a paver walkway (you can read about that here and here).  And the pavers looked beautiful!  We were thrilled with how the walkway part of the project turned out.

stone-paver-walkway

landscaping-paver-walkway

But, we still had that not-so-pretty planter area to the left.  The concrete edgers were kind of a snooze and the lack of plants didn't add any excitement either.

front-yard-before

So once spring hit, we began to tackle this area and install a retaining wall. Rob had the honor of removing the old edgers and digging up the area.

retaining-wall-area

Then he started installing new pavers from Home Depot (I can't find them on their website but they are the Windsor 4" x 12" retaining wall block).  Since our front yard slopes, Rob broke out the lever to see how deep to place the pavers to create an even level.

retaining-wall-base

You can see here how some pavers were buried into the ground, while others weren't, to create a level wall in this photo:

installing-retaining-wall

Once the base was down, we added two more rows of pavers.  To help with the slope and also add some interest, we decided to do a two-tier retaining wall.

building-retaining-wall

paver-retaining-wall

And we ended up with this:

front-yard-retaining-wall

Not bad, right?! We also added some top soil to fill in the retaining wall so we can plant some pretty flowers and shrubs.

front-yard-landscaping-wall

We still have a lot of planting ahead of us, but all of the hardscaping is done and it looks pretty darn good, if I do say so myself.

paver-walkway-and-retaining-wall

Here's another look at how far we've come with a before/during/almost-after photo:


I'm really proud of the walkway and retaining wall so far and can't wait to add plants to finish the job.  Any suggestions for good heat-tolerant flowers and shrubs?