September 29, 2011

Fall Door Decor

I spent some time yesterday sprucing up my front yard to get it ready for Fall.  I added some seasonal colors to spice up my door décor.

fall-front-door-decor

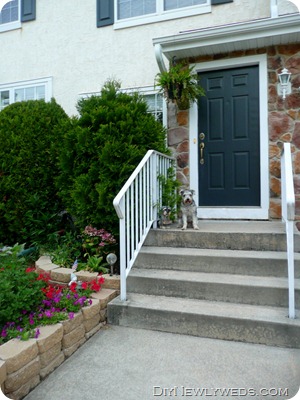
Here’s a look at the door-before.  My front door décor was much simpler over the summer:


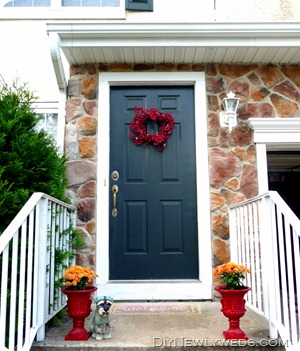
For the fall, I decided my door could use some brighter colors.  My red planters actually started off in a plain color.  I picked them up at a yard sale for just a few dollars (and later found a receipt inside showing that they were originally $30 each at Michaels- score!).  I was going to paint them a neutral color or ORB, but at the last minute decided to try something fun and paint them red.

planter-urns
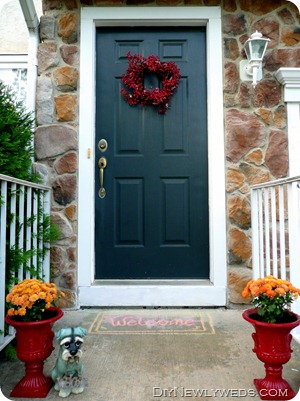
I’m so happy that I did because I am in love with this red color (regal red by Rustoleum).  Our home owner's association won't let us paint the front door (they all must be this dark greenish color), so I really like these pops of color.

red-outdoor-planter
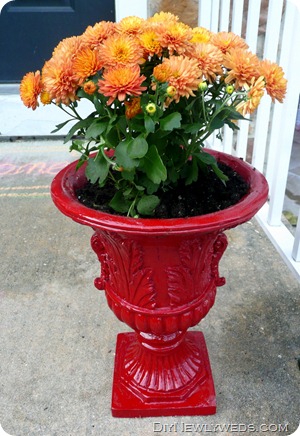
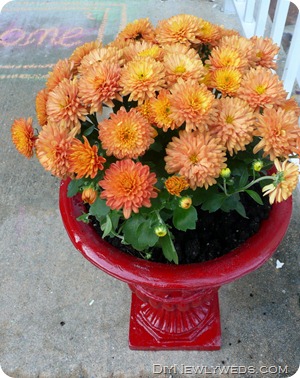
I popped in some orange mums and I love how cheery the orange and red look together.

red-planter
mum-planters

To add some more red to the décor, I added a cranberry wreath.  I think the wreath looks nice along with the red planters, but I was a little hesitant to hang it because it looks a little Christmasy.  What do you think?

fall-door-decor
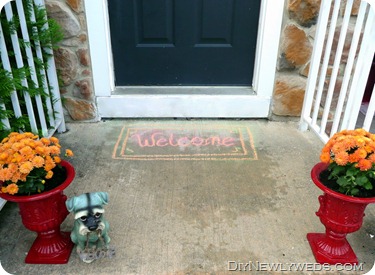
Somehow, I misplaced my front door mat (I have no idea how, it’s a pretty strange thing to misplace) so I decided to try something fun for the welcome mat.  Inspired by a chalk door mat I found on Pinterest (originally from Suitably Cool), I drew a welcome mat with sidewalk chalk!  I thought this was such an easy way to try something fun and new.

chalk-welcome-mat
So that’s my fall door, y’all!  It makes me so happy to see the cheerful colors!

red-planter-with-mums
fall-outdoor-decor
Have you decorated your door for Fall?

I’m joining the fun at Rhoda’s Door Décor party, the DIY Showoff, and Hooked on Houses

September 26, 2011

I Love Lamp

I’m not just saying it, I love lamp. 


I’m talking about this glass lamp that I picked up at a garage sale for just $2.50.

glass-lamp-makeover

What?  You’re not in love with it’s brassy finish?  Well me neither.  I love this lamp, but only after some serious spray painting to change its finish. 

After a few coats of Rustoleum, this lamp got the silver treatment and is now much more lovable. 

glass-lamp

I replaced an old lamp (another garage sale find from a few years ago), with the new glass lamp on my family room side table and like it much better.

side-table-lamp

diy-glass-lamp-makeover

I picked up the lampshade at another garage sale for $3 bucks, bringing the total for this lamp to just $5.50.  So not only do I love the lamp, but I love the price too!  Especially since I had been drooling over these much more expensive glass lamps before finding my steal.

pottery-barn-lamp

crate-barrel-glass-lamp

pottery-barn-glass-lamp-rope

I like the idea of filling the lamp with something like the Pottery Barn lamp above.  Maybe not rope, but I think shells would look nice, like the lamp from Cougar Town (my favorite TV “home”).


cougar-town-glass-lamp
I think I’ll enjoy the lamp as-is for now, but might be tempted to add some shells to it next summer.  Here’s another look at the lamp, with the before and after shots.

glass-lamp-before-and-after

What do you think of my garage sale lamp makeover?  Should I leave it empty for now or try to fill it with something?

I'm linking this project to Southern HospitalityHouse of Hepworths, and The DIY Showoff; check out the other great projects featured.

September 23, 2011

Dining Room Tour

My house tour is moving back downstairs today with a look at our dining room.  Since it’s easy to ignore a dining room, we make an effort to eat in here whenever we can so we can take advantage of the room.  Plus, dinners just seem nicer when you eat them at a dining room table rather than on the couch!

Here’s a look at our dining room.  You might remember that recently I changed up the orientation of our dining room table.  I like the new orientation for now, but I think I will move the table back around the other way once it gets closer to the holidays.

dining-room

We have two still-life paintings in the dining room, both of which were painted by my very talented Dad.  I think the paintings are cheery and I love the color they add to the room.  I chose to leave them unframed, with a gallery wrap instead.

dining-room-table

I still have my summer centerpiece on the table, which is simply a collection of white candles on a marble tray.

dining-room-centerpiece

On the back wall, we have a tray table that is convenient to place food and drinks on during big dinners, but is used to display family photos the rest of the time.

dining-room-tray-table

dining-room-cabinet

I think dining rooms are a great place to display family photos, so we have some of our wedding pictures on another wall as well.

photo-frame

I really enjoy our dining room and love hosting family gatherings in it.  Someday, I’d like to update the lighting fixture (it was there when we bought the house) and maybe add some board and batten walls, but in the meanwhile I love the dining room just the way it is.


I’m linking this post up to the dining rooms party at Involving Color.


P.S. The 3M giveaway is still going on, make sure you enter!

Master Bedroom Decorating Inspiration

One of my goals for this year is to refresh my bedroom (it’s one of my New DIYear resolutions for this year).  So with only a few months left this year, I better get a move on it!  Of course, Pinterest is a great source of inspiration and I found some great bedroom ideas on the site.  Check out two of my favorite master bedrooms (from Studio Ten 25 and BHG):

master-bedroom-inspiration

bedroom-inspiration


With this inspiration,  I created a master bedroom mood board for myself.  Check it out:
master-bedroom-inspiration-board

I started the mood board with a couple of items I already own (the headboard and dresser) and added some fun accessories to it to create my ideal master bedroom.  The fun thing about mood boards is that you don’t have to worry costs (because that $200 pendant isn’t in my budget, no matter how much I like it).  Yet, mood boards are still helpful because I can now shop for similar pieces, keeping these picks in mind .

Here’s a closer look at my dreamy bedroom:

bedding-inspiration


bedroom-inspiration-furniture


bedroom-furnitutre-inspiration

Z Gallerie Peacock Feathers

So that's my dreamy bedroom!  What does your dream bedroom look like?

I'm linking this up to the mood board party at Remodelaholic, stop by to check out the other awesome mood boards featured.

September 21, 2011

Cool Freezer Organization

We have a bit of a frozen food problem in our house.  As in, we buy tons of it and then shove it into our messy freezer anyway we can to get the door to close.  It's not the best strategy.  So I decided to finally do something about our freezer situation.  It was time to organize our freezer, since buying less frozen food isn't really an option (have you checked out the frozen food aisle at Trader Joe's?  Everything in it is delicious!  Seriously, we had butternut squash gnocchi for dinner last night and it was amazing).

Here's the embarrassing before picture (I snapped the photo after I had already cleared off the top shelf).

unorganized-freezer

And an extra embarrassing close up of our freezer mess:

messy-freezer

To get our freezer into shape, I cleared it out completely.  This also provided me with the opportunity to wipe down the freezer which was needed after a recent frozen can of Dr. Pepper explosion incident (I'm not pointing any fingers, but it wasn't me or the dog).

clean-freezer

I threw out any old food (some things had been in there since we moved in three years ago -eek!) and I stacked all of the remaining food on the kitchen table and sorted it by type of food.  I found that our messy freezer had led us to unknowingly buy duplicates of a few items, like 3 boxes of waffles and 2 boxes of vegetarian corn dogs (I'm particularly embarrassed by that one because I can assure you that I'm not eating corn dogs by the box-full).

frozen-food

Once everything was cleared out and clean, I began to put the food back into the freezer.  This time, I assigned specific shelves to types of food.

freezer-organization

So meats, got their own section just for meats.  Fish/seafood got their own shelf.  Frozen fruits and veggies got their own, and so forth.  I also labeled each shelf, simply using painter's tape and a sharpie, so that there would be no question about where things should go.  I think that assigning specific shelves will also keep our shopping lists in check because we'll be able to easily tell if we have too many frozen veggies or not enough, based on how full the assigned shelves are.  

organized-freezer

I also added a few storage boxes to help us easily find things and neatly stack the items.  So my beloved Trader Joe's frozen meals got their own box and frozen fish got a second box (most of the frozen fish is bagged so the box keeps the bags neatly stacked).

freezer-organizing

We've had this new freezer organization system in place for about a week now and it's working great!  We're keeping items in their proper spots and it's been a breeze to find what we're looking for.  So that's my "cool" freezer organization (sorry, I couldn't resist the puns!).  Do you have any tips for keeping your fridge or freezer neat and organized?

I'm linking this project to I Heart Organizing.

September 20, 2011

DIY Sea Grass Headboard

Out guest room needed a headboard, but our lack of budget didn't leave us with many options.  Plus, we wanted something a little on the tropical looking side to match the rest of the room's decor. Happily, I was able to meet both of these criteria by making a $2 seagrass headboard.  Yep, just two buckaroos!

I found a seagrass/straw (I'm not sure what the proper terminolgy is) beach mat for $1.99 at the Christmas Tree Shops and it was just what I needed.

seagrass-beach-mat

how-to-diy-headboard

I used a seam ripper to detach the flap of fabric that made the carrying case from the rest of the beach mat. Unfortunately the carrying case was stitched directly to the strip of green ribbon surrounding the mat, so the seam ripper took apart the green ribbon too.  But that was an easy fix as I was able to simply reattach the ribbon with some hot glue.

straw-beach-mat

I could have probably just nailed the beach mat to the wall right then, but I wanted to make the mat a little sturdier and look more headboard-like, so I decided that the mat alone wasn't enough. Luckily, we had a big giant box our recycling pile which was perfect as a headboard backing. I removed the heavy duty staples from the box and flattened it to create a backing for the beach mat.  I cut the excess cardboard away so it was just the perfect size for the mat and didn't show behind it.

diy-headboard
Then I simply hot glued the mat to the cardboard. I was surprised how well the hot glue adhered the mat to the cardboard as it created a really strong bond. With that, my headboard was complete!  Here it is standing upright (you can tell it's much sturdier than the floppy pre-cardboard mat in the photo above):

how-to-make-a-headboard

Next, I simply nailed the straw/seagrass headboard to the wall behind the bed. I used a common nail (yes, that's actually the proper name for the nail- I had to look it up) which had a larger flat head that kept the mat a little more in place.  I had to play around with the spacing a little and needed to rehang the art above the bed higher. Ideally, I would have hung the headboard higher to show off more of it, but the art is just to large and is already hung as high as I think it can reasonably go. I probably need some smaller art now, but I'm workin' with what I have.

cheap-diy-headboard

Here's how the headboard looks in the room now.


diy-tropical-headboard


And a before and after headboard look:


I love how the headboard turned out, especially for just $2!  I'm considering taking the headboard one step further and stenciling a pattern or tropical design (maybe a coral or palm leaf) to the headboard.  How do you like the headboard?  Do you think I should leave it as is or paint something on to it?

September 19, 2011

Tropical Guest Room Makeover

My house tour is moving upstairs today to our guest bedroom. Or rather our no-guest bedroom since most of our friends and family live close by and we never actually have guests stay overnight.  But we set up a guest room anyway since we already had a mattress and some accessories from Rob's bachelor days. Plus it makes a nice reading room and the extra bed has come in handy when one of us has been really sick and wanted to keep our germs to ourselves.  

Since the room isn't used too often we didn't want to spend much money on it (okay, no money) and haven't done any major updates, but we have made a few small improvements.  Here's how the room has looked before:


The mattress, bedding, and art are leftovers from Rob's pre-married days. Since our budget for this room was basically $0 and we both like a tropical look, this stuff stayed. Plus all of the tropical stuff kind of makes us feel like we're on vacation when we go in here.

But the room needed some improvements. Namely, we had to get the mattress off the ground and the bed needed a headboard.  So here's the room after these, and a couple other, updates:


 Luckily, my Dad had an extra bed frame that he gave to us so that got the bed off the ground. I was surprised that the bed frame made the bed look so much higher than before.


I also added a seagrass headboard that I made myself. You will never believe how cheaply and easily I made this, but I'll share the full tutorial tomorrow.

DSC05759

In addition to the bed updates, we also swapped out the small tray table with a rustic end table (a free hand-me-down from my cousin).  I like how the rustic table looks along with the tropical elements in the room.


To accessorize the table, I added a tropical lamp (Rob's from back in the day) and a plant set on top of an upside down wicker planter (a $1 garage sale find).


I'm happy with how the room turned out considering we only spent a few dollars to update it.  Now, if we ever do have guests we'll have a comfy room for them to stay in.  In the meanwhile, our pup has another napping spot.


What do you think of our tropical guest room?  Any suggestions on how we can further spruce this room up on a dime?

P.S. The 3M prize pack giveaway is still going on- don't forget to enter!


I'm linking this post up to Guest Room party at DIY by Design.

September 16, 2011

Powder Room Makeover

I’m excited to share the next room of my house tour today, the powder room.  The powder room is one of my new diyear resolutions from this year so I’m happy to officially check it off of my to-do list!  My goal was to makeover the bathroom for under $75 and I’m happy to say we come in under budget.

First, a look at the scaaaarrrry before of this room from when we first moved in.  BRIGHT blue paint everywhere.  And by everywhere I mean on the walls, back of the door, and ceiling.  Yes, bright blue paint even on the ceiling. 

powder-room-before-makeover

bathroom-before

To make matters worse, before we moved in the previous owner replaced the light fixture from the above photo with this builder’s grade one.

bathroom-light-fixture

Needless to say, the first thing we did when we moved in was repaint this room a more reasonable color.  This was actually the first room we painted and Rob chose the color, Misty Surf by Behr, which is a much lighter and subdued blue.

The room looked much better after being painted and stayed this way for several months…until I found a major score at a garage sale.  I found this lighting fixture, plus an outlet cover, and towel ring for just $8 total!

powder-room-light-fixture

The light and towel ring made a huge difference in this small room.  I also swapped out the light switch covers, but had to buy a second one at Home Depot to match the one I got at the garage sale.

bathroom-mirror-before

The bathroom was looking much better, but it still needed a new mirror.  Luckily, I found another great deal at Ross with this great mirror for just $13!  The mirror plus a new soap dispenser and some art completed the bathroom makeover!  Here’s the much better “after” of the room:

powder-room-makeover

towel-holder

I repainted a silver candleholder (from Target many years ago) to match the new bathroom accessories.

candle-art

Some cute doggy art (another Ross score) adds some fun to the bathroom:

dog-art

powder-room

Here’s another look at the before and after:

powder-room-before-makeoverpowder-room-makeover

Much better, if I do say so myself!  And here’s a look at how we kept to our cheap budget for the bathroom makeover:

$28 – Behr Paint
$8 - Lighting Fixture/Towel Ring/Light Switch from Garage Sale
$6 – Second Light Switch
$13 – Mirror from Ross
$9 – Doggy Artwork on Clearance at Ross
$4 – Soap Dispenser on Clearance at Ross
Total =  $68!

So that’s my bathroom makeover on the cheap.  Pretty, pretty good as Larry David would say.  What do you think?

Don’t forget to enter to win my 3M prize pack giveaway!


I’m linking up this post to the bathroom inspiration party over at Homemaker on a Dime, and at Southern Hospitality, Beneath My Heart.